K8S之Service概述与代理说明,并详解所有的service服务类型与示例
主机配置规划
| 服务器名称(hostname) | 系统版本 | 配置 | 内网IP | 外网IP(模拟) |
|---|---|---|---|---|
| k8s-master | CentOS7.7 | 2C/4G/20G | 172.16.1.110 | 10.0.0.110 |
| k8s-node01 | CentOS7.7 | 2C/4G/20G | 172.16.1.111 | 10.0.0.111 |
| k8s-node02 | CentOS7.7 | 2C/4G/20G | 172.16.1.112 | 10.0.0.112 |
Service概述
Kubernetes Service定义了这样一种抽象:逻辑上的一组 Pod,一种可以访问它们的策略 —— 通常被称为微服务。这一组 Pod 能够被 Service 访问到,通常是通过 selector实现的。
举例:考虑一个图片处理 backend,它运行了3个副本。这些副本是可互换的 —— frontend 不需要关心它们调用了哪个 backend 副本。 然而组成这一组 backend 程序的 Pod 实际上可能会发生变化,frontend 客户端不应该也没必要知道,而且也不需要跟踪这一组 backend 的状态。Service 定义的抽象能够解耦这种关联。
Service可以提供负载均衡的能力,但是使用上存在如下限制:
- 只能提供4层负载均衡能力,而没有7层功能。有时我们可能需要更多的匹配规则来转发请求,这点上4层负载均衡是不支持的、
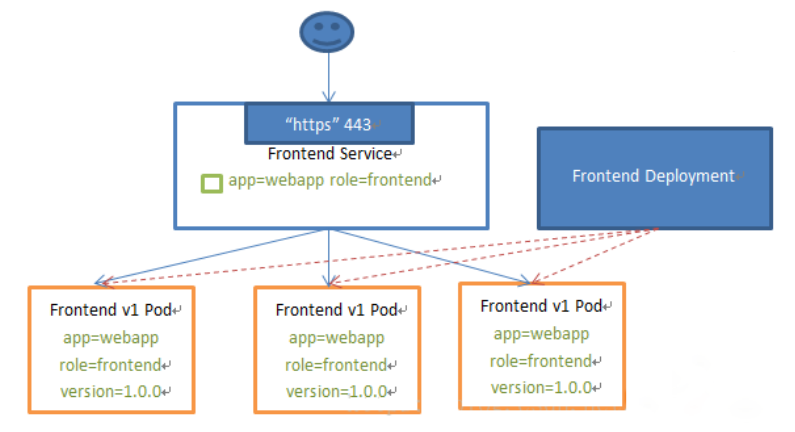
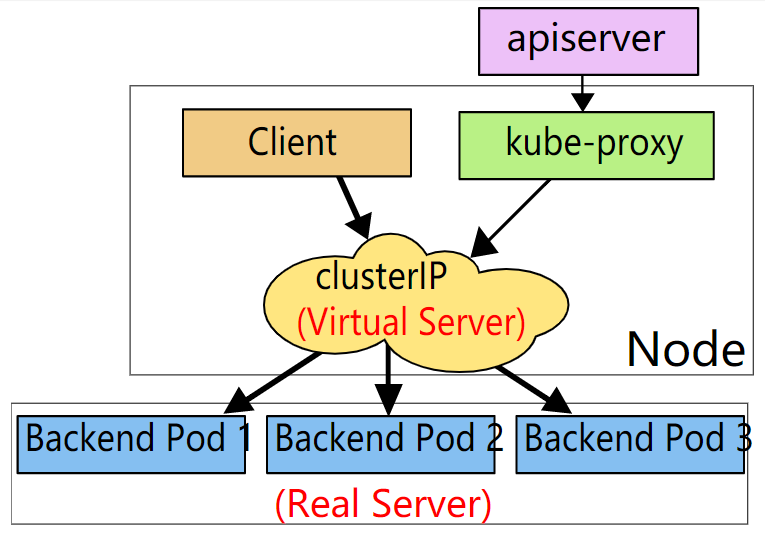
如web访问的service服务示例图:
VIP和Service代理
在 Kubernetes 集群中,每个 Node 运行一个 kube-proxy 进程。kube-proxy 负责为 Service 实现了一种 VIP(虚拟 IP)的形式,而不是 ExternalName 的形式。
从Kubernetes v1.0开始,已经可以使用 userspace代理模式。Kubernetes v1.1添加了 iptables 代理模式,在 Kubernetes v1.2 中kube-proxy 的 iptables 模式成为默认设置。Kubernetes v1.8添加了 ipvs 代理模式。
原因如下:
- DNS 实现的历史由来已久,它不遵守记录 TTL,并且在名称查找到结果后会对其进行缓存。
- 有些应用程序仅执行一次 DNS 查找,并无限期地缓存结果。
- 即使应用和库进行了适当的重新解析,DNS 记录上的 TTL 值低或为零也可能会给 DNS 带来高负载,从而使管理变得困难。
总之就是因为有缓存,因此不合适。
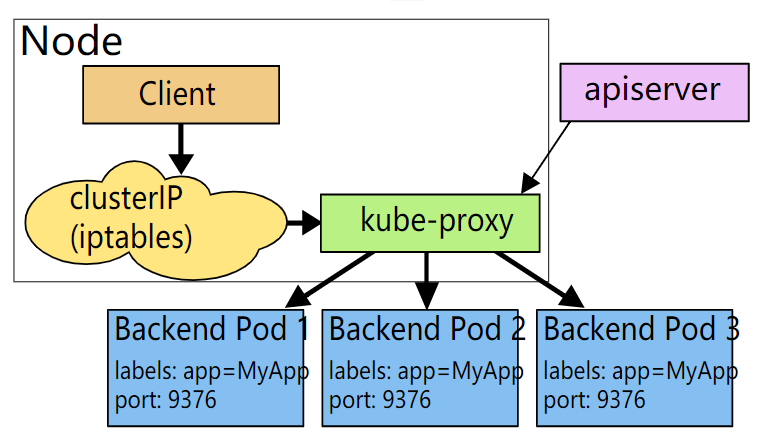
userspace代理模式
这种模式,kube-proxy 会监视 Kubernetes master 对 Service 对象和 Endpoints 对象的添加和移除。 对每个 Service,它会在本地 Node 上打开一个端口(随机选择)。 任何连接到“代理端口”的请求,都会被代理到 Service 的backend Pods 中的某个上面(如 Endpoints 所报告的一样)。 使用哪个 backend Pod,是 kube-proxy 基于 SessionAffinity 来确定的。
最后,它配置 iptables 规则,捕获到达该 Service 的 clusterIP(是虚拟 IP)和 Port 的请求,并重定向到代理端口,代理端口再代理请求到 backend Pod。
默认情况下,userspace模式下的kube-proxy通过循环算法选择后端。
默认的策略是,通过 round-robin 算法来选择 backend Pod。
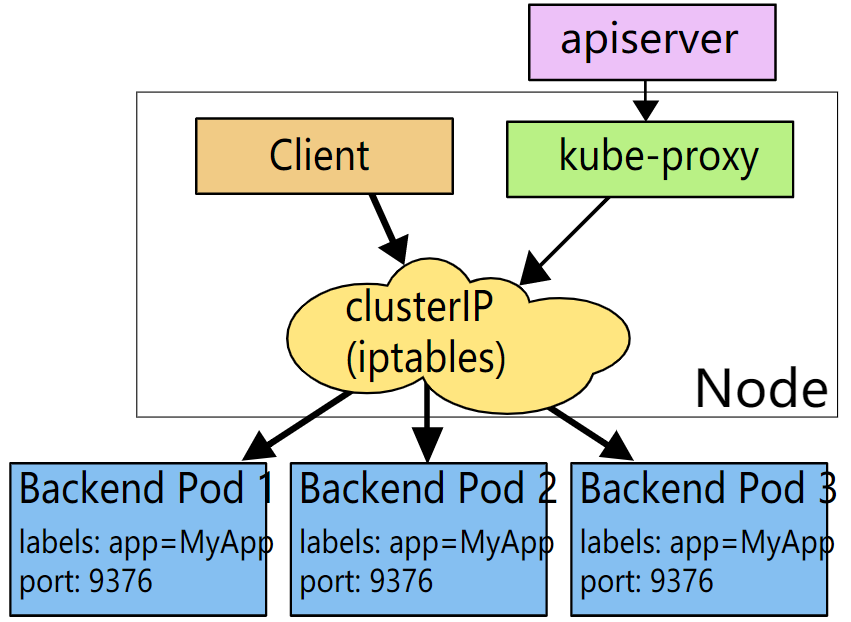
iptables 代理模式
这种模式,kube-proxy 会监视 Kubernetes 控制节点对 Service 对象和 Endpoints 对象的添加和移除。 对每个 Service,它会配置 iptables 规则,从而捕获到达该 Service 的 clusterIP 和端口的请求,进而将请求重定向到 Service 的一组 backend 中的某个上面。对于每个 Endpoints 对象,它也会配置 iptables 规则,这个规则会选择一个 backend 组合。
默认的策略是,kube-proxy 在 iptables 模式下随机选择一个 backend。
使用 iptables 处理流量具有较低的系统开销,因为流量由 Linux netfilter 处理,而无需在用户空间和内核空间之间切换。 这种方法也可能更可靠。
如果 kube-proxy 在 iptables模式下运行,并且所选的第一个 Pod 没有响应,则连接失败。 这与userspace模式不同:在这种情况下,kube-proxy 将检测到与第一个 Pod 的连接已失败,并会自动使用其他后端 Pod 重试。
我们可以使用 Pod readiness 探测器 验证后端 Pod 是否可以正常工作,以便 iptables 模式下的 kube-proxy 仅看到测试正常的后端。这样做意味着可以避免将流量通过 kube-proxy 发送到已知已失败的Pod。
IPVS 代理模式
在 ipvs 模式下,kube-proxy监视Kubernetes服务(Service)和端点(Endpoints),调用 netlink 接口相应地创建 IPVS 规则, 并定期将 IPVS 规则与 Kubernetes服务(Service)和端点(Endpoints)同步。该控制循环可确保 IPVS 状态与所需状态匹配。访问服务(Service)时,IPVS 将流量定向到后端Pod之一。
IPVS代理模式基于类似于 iptables 模式的 netfilter 挂钩函数,但是使用哈希表作为基础数据结构,并且在内核空间中工作。 这意味着,与 iptables 模式下的 kube-proxy 相比,IPVS 模式下的 kube-proxy 重定向通信的延迟要短,并且在同步代理规则时具有更好的性能。与其他代理模式相比,IPVS 模式还支持更高的网络流量吞吐量。
IPVS提供了更多选项来平衡后端Pod的流量。这些是:
- rr: round-robin
- lc: least connection (smallest number of open connections)
- dh: destination hashing
- sh: source hashing
- sed: shortest expected delay
- nq: never queue
注意:要在 IPVS 模式下运行 kube-proxy,必须在启动 kube-proxy 之前使 IPVS Linux 在节点上可用。 当 kube-proxy 以 IPVS 代理模式启动时,它将验证 IPVS 内核模块是否可用。 如果未检测到 IPVS 内核模块,则 kube-proxy 将退回到以 iptables 代理模式运行。
Service服务类型
Kubernetes 中Service有以下4中类型:
- ClusterIP:默认类型,自动分配一个仅Cluster内部可以访问的虚拟IP
- NodePort:通过每个 Node 上的 IP 和静态端口(NodePort)暴露服务。以ClusterIP为基础,NodePort 服务会路由到 ClusterIP 服务。通过请求
<NodeIP>:<NodePort>,可以从集群的外部访问一个集群内部的 NodePort 服务。 - LoadBalancer:使用云提供商的负载均衡器,可以向外部暴露服务。外部的负载均衡器可以路由到 NodePort 服务和 ClusterIP 服务。
- ExternalName:通过返回 CNAME 和它的值,可以将服务映射到 externalName 字段的内容(例如,foo.bar.example.com)。没有任何类型代理被创建。
需要注意的是:Service 能够将一个接收 port 映射到任意的 targetPort。默认情况下,targetPort 将被设置为与 port 字段相同的值。
Service域名格式:$(service name).$(namespace).svc.cluster.local,其中 cluster.local 为指定的集群的域名
Deployment的yaml信息
yaml文件
1 | [root@k8s-master service]# pwd |
启动Deployment并查看状态
1 | [root@k8s-master service]# kubectl apply -f myapp-deploy.yaml |
curl访问
1 | [root@k8s-master service]# curl 10.244.2.116 |
ClusterIP类型示例
yaml文件
1 | [root@k8s-master service]# pwd |
启动Service并查看状态
1 | [root@k8s-master service]# kubectl apply -f myapp-svc-ClusterIP.yaml |
查看pod信息
1 | [root@k8s-master service]# kubectl get pod -o wide --show-labels |
查看ipvs信息
1 | [root@k8s-master service]# ipvsadm -Ln |
curl访问
1 | [root@k8s-master service]# curl 10.106.66.120 |
备注:如果访问失败,请参考如下文章:
「Kubernetes K8S在IPVS代理模式下svc服务的ClusterIP类型访问失败处理」
Headless Services
有时不需要或不想要负载均衡,以及单独的 Service IP。遇到这种情况,可以通过指定 Cluster IP(spec.clusterIP)的值为 “None” 来创建 Headless Service。
这对headless Service 并不会分配 Cluster IP,kube-proxy 不会处理它们,而且平台也不会为它们进行负载均衡和路由。
- 第一种:自主选择权,有时候client想自己来决定使用哪个Real Server,可以通过查询DNS来获取Real Server的信息。
- 第二种:Headless Services还有一个用处(PS:也就是我们需要的那个特性)。Headless Service对应的每一个Endpoints,即每一个Pod,都会有对应的DNS域名;这样Pod之间就可以互相访问。【结合statefulset有状态服务使用,如Web、MySQL集群】
yaml文件
1 | [root@k8s-master service]# pwd |
启动Service并查看状态和详情
1 | [root@k8s-master service]# kubectl apply -f myapp-svc-headless.yaml |
service只要创建成功就会写入到coredns。我们得到coredns IP的命令如下:
1 | [root@k8s-master service]# kubectl get pod -o wide -A | grep 'coredns' |
在宿主机安装nslookup、dig命令安装
1 | yum install -y bind-utils |
coredns记录信息如下
1 | # 其中 10.244.0.61 为 coredns IP |
NodePort类型示例
如果将 type 字段设置为 NodePort,则 Kubernetes 控制层面将在 --service-node-port-range 标志指定的范围内分配端口(默认值:30000-32767)。
yaml文件
1 | [root@k8s-master service]# pwd |
启动Service并查看状态
1 | [root@k8s-master service]# kubectl apply -f myapp-svc-NodePort.yaml |
由上可见,类型变为了NodePort
查看ipvs信息
1 | [root@k8s-master service]# ipvsadm -Ln |
端口查看,可见在本地宿主机监听了相应的端口(备注:集群所有机器都监听了该端口)
1 | # 集群所有机器都可以执行查看 |
curl通过ClusterIP访问
1 | # 通过ClusterIP访问 |
curl通过节点IP访问
1 | # 通过集群节点IP访问 |
访问日志查看
1 | kubectl logs -f svc/myapp-nodeport |
LoadBalancer类型示例
需要相关云厂商服务支持,这里就不表述了。
ExternalName类型示例
这种类型的Service通过返回CNAME和它的值,可以将服务映射到externalName字段的内容(例如:my.k8s.example.com;可以实现跨namespace名称空间访问)。ExternalName Service是Service的特例,它没有selector,也没有定义任何的端口和Endpoint。相反的,对于运行在集群外部的服务,它通过返回该外部服务的别名这种方式提供服务。
具体使用参见:「Kubernetes K8S之Pod跨namespace名称空间访问Service服务」
yaml文件
1 | [root@k8s-master service]# pwd |
启动Service并查看状态
1 | [root@k8s-master service]# kubectl apply -f myapp-svc-ExternalName.yaml |
由上可见,类型变为了ExternalName
宿主机dig命令安装
1 | yum install -y bind-utils |
coredns记录信息如下
1 | # 其中 10.244.0.61 为 coredns IP |
ExternalIP示例
如果外部的 IP 路由到集群中一个或多个 Node 上,Kubernetes Service 会被暴露给这些 externalIPs。通过外部 IP(作为目的 IP 地址)进入到集群,打到 Service 端口上的流量,将会被路由到 Service 的 Endpoint 上。
externalIPs 不会被 Kubernetes 管理,它属于集群管理员的职责范畴。
根据 Service 的规定,externalIPs 可以同任意的 ServiceType 来一起指定。在下面的例子中,my-service 可以在【模拟外网IP】“10.0.0.240”(externalIP:port) 上被客户端访问。
yaml文件
1 | [root@k8s-master service]# pwd |
启动Service并查看状态
1 | [root@k8s-master service]# kubectl apply -f myapp-svc-externalIP.yaml |
查看ipvs信息
1 | [root@k8s-master service]# ipvsadm -Ln |
curl访问,通过ClusterIP
1 | [root@k8s-master service]# curl 10.107.186.167 |
curl访问,通过ExternalIP
1 | [root@k8s-master service]# curl 10.0.0.240 |
相关阅读
1、Kubernetes K8S在IPVS代理模式下svc服务的ClusterIP类型访问失败处理
2、Kubernetes K8S之Pod跨namespace名称空间访问Service服务
3、kubernetes学习Service之headless和statefulSet结合
4、linuxea:kubernetes Headless Service无头服务